
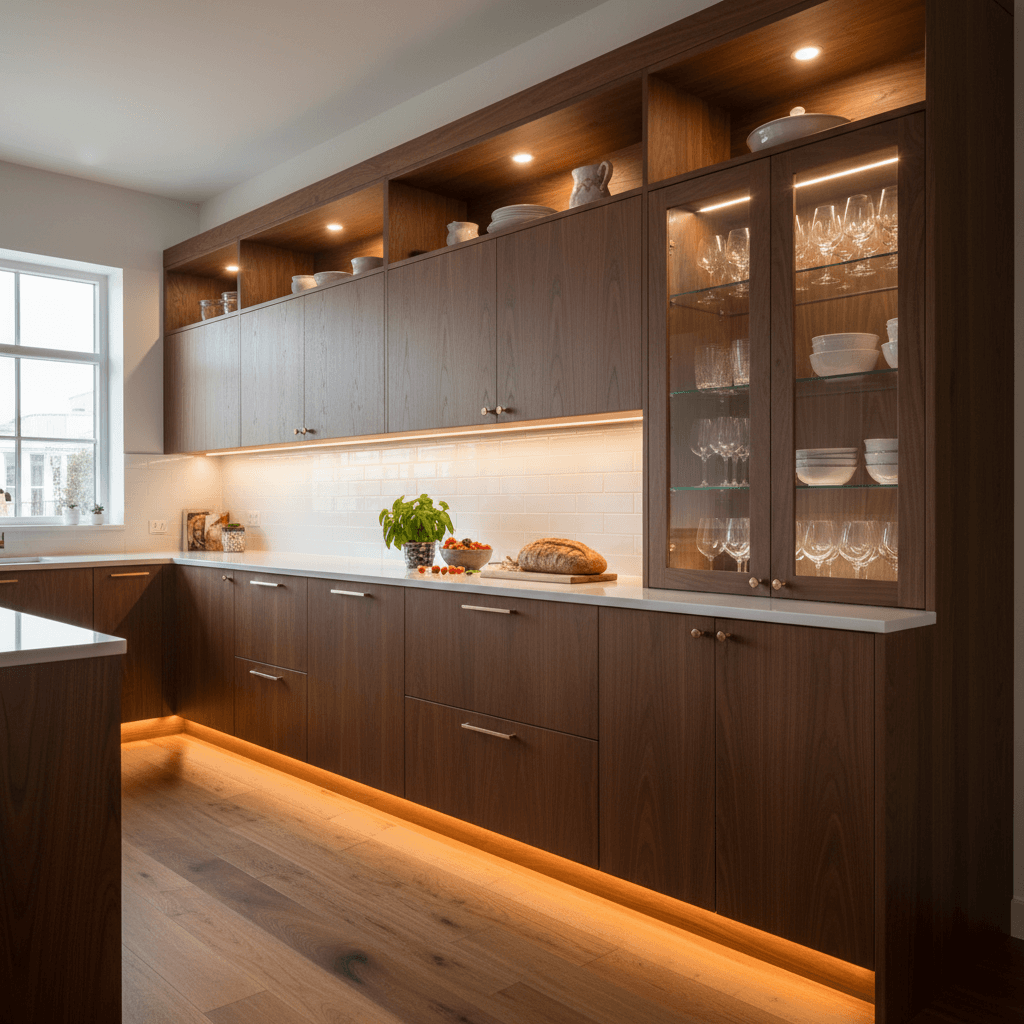
Adding cabinet lighting transforms your kitchen’s vibe and use, especially after dark. Smart lighting brightens up countertops for safer food prep, highlights your favorite glassware, and wraps the room in a cozy glow. Practical tips help craft a lighting plan that fits your cooking style and daily routine perfectly. Dive in to discover easy steps that make your kitchen not just functional but inviting, turning every meal prep into a brighter experience that feels just right. Keep reading to unlock the secrets that make your kitchen shine in ways you never imagined.
Whether you are remodeling or updating a few areas, the right cabinet lighting blends functionality and style. I will cover types of fixtures, placement tips, power and control options, and maintenance advice so you can make informed choices and avoid common pitfalls.
Integrating Cabinet Lighting into Your Kitchen Design for Function and Style
When integrating cabinet lighting into a kitchen design the first move is to identify what you want the light to do. Are you solving a task lighting gap above a countertop, highlighting display cabinets, or creating ambient layers for evening use Those goals determine brightness, color temperature, and placement.
Start by mapping work zones such as the sink, stove, and food prep areas. For each zone note the surface material and height. A darker countertop requires more lumens to reach the same perceived brightness as a lighter surface. For typical under cabinet task lighting plan on 300 to 500 lumens per linear foot over the work surface. That number will vary with fixture type and beam spread.
Types of Cabinet Lighting and Where They Work Best
There are several common fixture types used when integrating cabinet lighting. Each one has strengths depending on cabinet depth, desired look, and budget. Choosing the right type reduces glare and delivers the look you expect.
Under cabinet LED strips and tape
LED strips and tape are flexible and fit easily into the underside of upper cabinets. They produce a continuous line of light that is great for even task coverage. Look for high CRI values if you want accurate color at the prep surface. Typical recommendations are CRI 90 or higher for kitchens where food presentation matters.
Strip light spacing and mounting height matter. If you install the strips right at the front edge of the cabinet underside you minimize backsplash shadows. If placed too far back you may see banding on the countertop. Use aluminum channels with diffusers to soften the light and protect the LEDs.
Puck lights and small bar fixtures
Puck lights are small round fixtures that produce focused pools of light. They work well when you want accent spots inside glass-front cabinets or targeted task illumination. Bars with multiple small LEDs can be used when you want a hybrid between spot and linear light.
Planning Electrical Layout and Power Sources for Integrating Cabinet Lighting
Good planning avoids hidden surprises during installation. Determine where the power feed will come from and whether you need a new circuit or can tap an existing one. Small runs of LED tape may run on low voltage from a single transformer. Longer runs might call for 120 volt LED fixtures or multiple power drops to avoid voltage drop.
If you prefer a clean look with no visible adapters consider installing low voltage drivers in a drawer or behind a toe kick panel. If you plan on multiple labeled zones think about splitting the lighting into circuits or channels so you can control sections separately for scenes and energy savings.
For professional installation and local code compliance find a reliable installer and bring clear diagrams. If you want a local resource to review layout options and installation services check this company for lighting services Custom Cabinets of Orlando to see examples and get a quote.
Comparing LED strip tape puck and integrated cabinet fixtures
When selecting fixtures compare lumen output per foot, color rendering, color temperature, and warranty. LED tape is measured in lumens per foot while puck lights are rated per fixture. Integrated cabinet fixtures offer built in mounting and sometimes a more finished look but can be more costly to replace if the driver fails.
- Brightness and placement are linked. Higher lumen output may cause glare if the fixture is in direct sight lines.
- Color temperature is measured in Kelvin. For kitchens many homeowners choose between 2700K for a warm tone and 4000K for a neutral white. 3000K is a common compromise that feels warm yet maintains clarity.
- CRI or color rendering affects how food and finishes look under light. Choose CRI 90 or above for cabinets that display ceramics or produce food photography.
Tips for Installation and Placement for Task and Ambient Lighting
Follow these practical tips when integrating cabinet lighting to get consistent coverage and avoid glare. Small adjustments during install prevent shadowed counters and uneven highlights.
- Place under cabinet strips near the front edge to reduce backsplash shadows
- Use diffusers or frosted channels to mix point sources into a smooth wash
- For inside cabinets use low wattage fixtures with higher CRI so contents display well without heating the space
- Aim puck lights slightly toward the front of the shelf to light the face of displayed items
- Plan zones so task lights are independent from decorative accent lights
When lighting open shelves pay attention to the underside of the shelf above. A thin profile strip placed under the lip produces attractive illumination with no visible hardware. For deeper cabinets consider twin runs or higher output fixtures to reach the back surface.
Control Options and Energy Considerations for Cabinet Lighting
Control choices influence usability and energy use. Dimmers are useful for setting mood and adjusting brightness during different tasks. Some LED systems require compatible dimmers so match the dimmer type with the fixture specification. Look for LED specific dimmers and check minimum load requirements.
Smart controls offer scheduling and scene presets but add complexity. A simple multiway switch layout with dimmers works well for many kitchens. Motion sensors can be used inside pantry cabinets for automatic activation. Battery powered LED fixtures reduce wiring needs but require periodic battery changes which may not be ideal for heavy use areas.
From an energy standpoint modern LEDs use a fraction of the power of halogen or incandescent fixtures. Consider lumen per watt ratings when comparing products. A higher lumens per watt rating means you get more light for less power use.
Maintenance and Longevity of Cabinet Lighting Solutions
Cabinet lighting should be low maintenance to remain practical. Choose fixtures with long rated lifespans and reliable warranties. Many quality LEDs have rated life of 50 000 hours or more which translates to many years of typical household use.
Keep a small toolkit with replacement connectors and spare clips if you chose tape mounted in channels. Avoid high heat sources inside cabinets such as incandescent bulbs which reduce LED driver life if used in the same enclosed space. Clean diffusers with a mild detergent and soft cloth to prevent dust buildup that reduces light output over time.
Case Studies and Practical Examples of Integrating Cabinet Lighting
Example 1 Kitchen update with under cabinet strips and toe kick lighting
A mid sized kitchen replaced old fluorescent undercabinet fixtures with LED strips in aluminum channels. The strips were installed near the front edge for a uniform wash. The homeowner added toe kick strips on a separate circuit for evening ambiance. The result was improved task illumination and a gentle night light without lighting the whole room.
Example 2 Display cabinets with dimmable pucks
A client installed dimmable puck lights inside glass front cabinets to highlight dishware. The pucks were wired to a single dimmer so brightness could be reduced for evening use. Using high CRI pucks preserved the color of porcelain and glass making the display more inviting.
Integrating cabinet lighting is a practical upgrade that adds safety and visual appeal. Start by identifying task zones and desired visual effects then select fixtures that match those needs. Consider power layout and control strategies in the planning phase to avoid surprises during installation. With the right choices you get a kitchen that works better during food prep and looks inviting during gatherings.
If you are ready to move from planning to action consult a local lighting or cabinet professional to review your layout and provide a quote. A small investment in planning pays off with a clean installation, effective lighting, and fixtures that will last for years. Reach out for an on site assessment if you prefer a professional estimate and timeline.
